
Table of Contents
- Essential Overlanding Recovery Gear on a Shoestring Budget
- 1. LED Lighting for Trail Visibility
- 2. Tire Repair and Inflation Systems
- 3. Weatherproof Storage Solutions
- How to Build an Overland Rig on a Budget: DIY Approach vs. Pre-Built
- DIY Overlanding Gear: What You Can Install Yourself
- Used vs. New: Where to Save the Most
- Conclusion
Last Updated: August 7, 2026
Building an overland rig doesn't require emptying your wallet. Many budget-conscious adventurers assume they must choose between affordability and capability, but strategic upgrades deliver trail-ready performance at a fraction of premium prices. The best budget friendly overlanding upgrades focus on essentials that directly impact safety, reliability, and comfort, without the brand markup that doubles costs.
At Precision Upgrades, we've tracked what actually matters to overlanders on tight budgets. The gear that moves the needle isn't always the most expensive, it's the stuff that solves real problems: visibility in darkness, tire emergencies in remote locations, and secure storage for your gear.
Quick Overview: Best Budget-Friendly Overlanding Upgrades
| Upgrade Category | Best Budget Option | Typical Cost | Key Benefit |
|---|---|---|---|
| LED Lighting | Nilight 126W Spot/Flood Combo | $105.95 | Trail visibility in darkness |
| Tire Systems | Boulder Tools Heavy Duty Kit | $29.99-$50 | Emergency puncture repair |
| Air Inflation | Smittybilt 2.54 CFM Compressor | $112.49 | Tire pressure adjustment on trail |
| Storage | MTM Utility Boxes or RIDGID Toolbox | $9.49-$49.97 | Weatherproof gear organization |
| Communication | Midland GMRS Radios | $53.00-$439.99 per pair | Group communication off-grid |
Essential Overlanding Recovery Gear on a Shoestring Budget
Recovery equipment keeps you moving when things go wrong.
Start with the Boulder Tools Heavy Duty Tire Repair Kit. At roughly $29.99 to $50, it includes 15 tire plugs, full-size rasp and insert tools, pliers, a razor blade, four valve-stem repair sets, and a tire pressure gauge. The plugs are reliable enough to get you to camp or the nearest town on slow trail speeds.
Next, add the Smittybilt 2.54 CFM Air Compressor 2780 at $135.29-$159.99. It handles the core task: airing up tires after deflating them for soft-ground traction, or refilling a tire after a plug repair. Compact and portable, it fits under a seat or in a storage box.
For winching and recovery, skip the $2,000+ electric winch if you're starting out. Hand-operated recovery tools, snatch blocks, D-shackles, and kinetic ropes cost under $200 total and handle most stuck-vehicle situations with proper technique.
1. LED Lighting for Trail Visibility
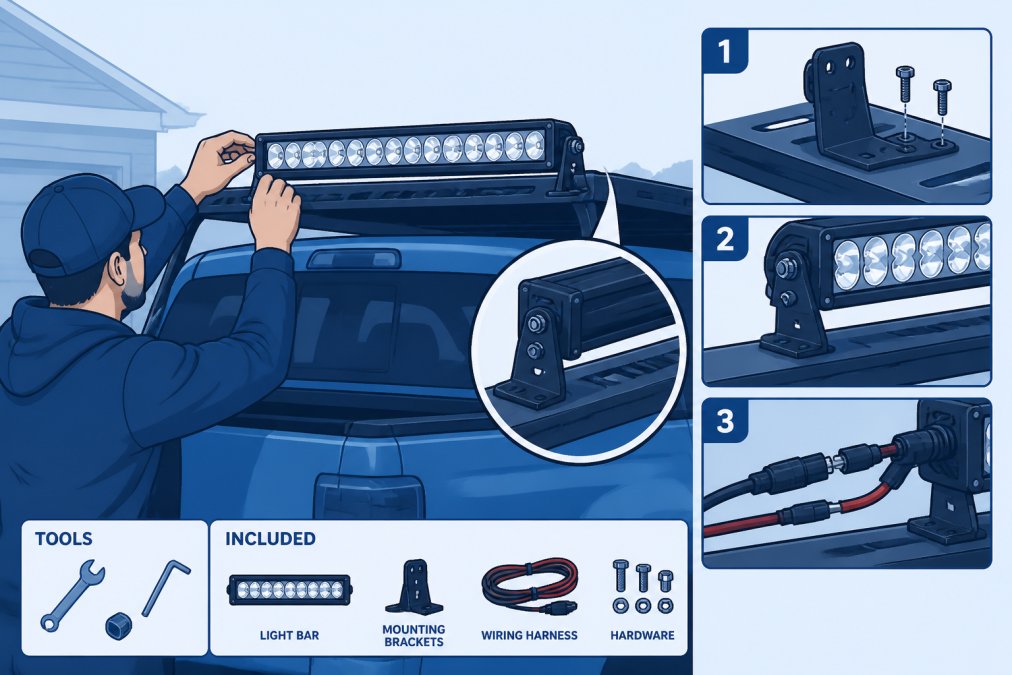
The Nilight 20 Inch 126W Spot Flood Combo LED Light Bar delivers genuine trail visibility at $105.95, a fraction of what premium brands charge for similar output.
The spot/flood combo pattern is ideal for overlanding. Spot beams cut through fog and dust to illuminate the trail ahead. Flood beams light up immediate surroundings, revealing obstacles on the sides of your vehicle. Together, they provide the 360-degree awareness you need when navigating in darkness.
IP67 water resistance means this light bar survives river crossings, heavy rain, and dust storms. Heat dissipation technology extends lifespan. Installation takes a few hours with basic wiring, the kit includes a harness and all connectors.
2. Tire Repair and Inflation Systems
Tire failure is the most common mechanical issue overlanders face. Budget solutions work here because the physics of tire repair doesn't change at different price points.
The Boulder Tools Heavy Duty Tire Repair Kit is the foundation at $29.99-$50. Fifteen plugs give you multiple repair attempts. The full-size rasp and insert tools are actual tools, not flimsy plastic implements. Pliers and a razor blade handle sidewall damage assessment. The tire pressure gauge verifies your repair held.
Pairing it with the Smittybilt 2.54 CFM Air Compressor creates a complete tire system. After plugging a puncture, you inflate the tire back to pressure. The compressor also lets you drop tire pressure for soft-sand or rocky terrain, lower pressure improves traction and ride comfort. On hard-pack roads, you inflate back to normal.
Many overlanders add a tire pressure monitoring system (TPMS) around $100-$150 as a second upgrade. On a shoestring budget, skip this initially. A visual inspection of your tires every morning catches most problems early.
If you're replacing tires anyway, choose tubeless over tube tires. Tubeless tires are easier to repair in the field, you plug the puncture and reinflate. Tube tires require removing the wheel, breaking the bead, extracting the tube, patching or replacing it, and reassembling.
3. Weatherproof Storage Solutions
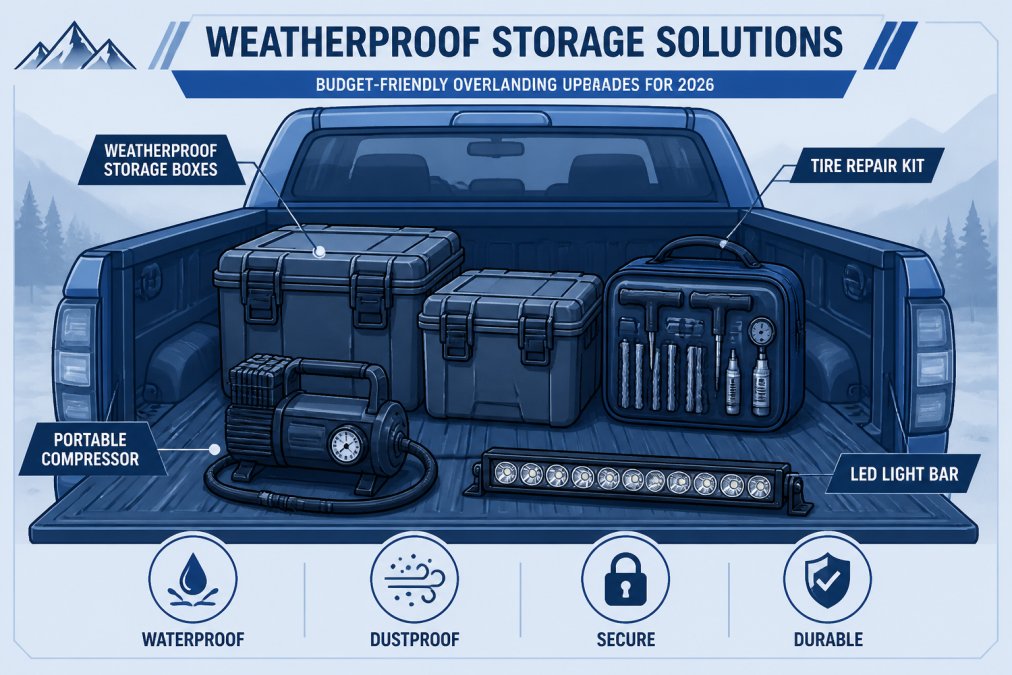
Gear organization separates comfortable overlanding from miserable overlanding. The budget approach uses multiple smaller boxes rather than one expensive integrated system.
The MTM Case-Gard Ammo Cans start around $9.49 for smaller models. Originally designed for ammunition storage, they're waterproof and dustproof with O-ring seals. They stack efficiently and come in various sizes. A 5-gallon can holds cooking gear. A larger can holds recovery tools.
The RIDGID Pro Tool Box costs $24.97 to $49.97 and offers similar protection with more internal organization. Metal latches secure the lid. Molded grooves allow stacking. The rubber seal keeps moisture out.
For larger loads, the Plano Sportsman's Trunk ($14.99-$42.50) handles bulk storage with heavy-duty latches and tie-down extensions.
Precision Upgrades also offers the 70L and 50L Overland Gear Boxes at $245 each. These combine weatherproof protection with overlanding-specific features, tie-down points, and modular interior organization. If your budget allows, they're worth the investment. If you're building your first rig, start with $50-$100 in smaller boxes and upgrade later.
Multiple smaller boxes beat one large box. If one gets damaged, you've lost part of your gear, not all of it. Smaller boxes fit under seats and in awkward spaces where a large trunk won't fit.
How to Build an Overland Rig on a Budget: DIY Approach vs. Pre-Built
Building your own rig costs 40-60% less than buying pre-assembled systems.
The DIY approach works if you have basic mechanical confidence. LED light bar installation requires running a power wire from your battery through a relay switch to the light bar. It's fundamentally simple: positive wire to positive, negative to negative, relay in between. YouTube has thousands of tutorials for your specific vehicle. Most overlanders complete this in 2-4 hours their first time.
Pre-built systems save time but cost significantly more. A pre-built roof rack system runs $800-$1,500. A DIY equivalent using basic roof rails and individual mounting hardware costs $200-$400.
For a first-time builder with a 2015-2020 Toyota 4Runner, the realistic budget breakdown looks like this:
- LED lighting: $105-$150
- Tire repair and inflation: $150-$200
- Storage boxes: $100-$200
- Basic recovery gear: $100-$150
- Camping furniture: $150-$300
Total: $605-$1,000 for a functional overlanding setup.
Compare that to a pre-built system from a shop, which easily reaches $3,000-$5,000 for similar capability.
DIY Overlanding Gear: What You Can Install Yourself
LED light bars are the most straightforward DIY project. You need a drill, a wire stripper, and a relay switch. The kit usually includes all connectors. Run the positive wire from your battery to the relay, the relay to the light bar. Run the negative from the light bar to a ground point on your chassis. Wire the switch to the relay. Test it. Done.
Storage box installation involves bolts, straps, or adhesive pads. Bolt it to your truck bed for permanent mounting. Use ratchet straps if you want to move it between vehicles. This takes 30 minutes to an hour.
Tire repair kit assembly requires zero installation. Unbox it, verify everything is present, store it in an accessible location.
Compressor installation means deciding between permanent mounting (bolted to a frame) or portable (stored in a box, connected when needed). Portable is easier for beginners.
Camp furniture requires zero installation.
Suspension upgrades, brake modifications, and driveline work are where DIY becomes risky. These affect safety and vehicle handling. If you're not confident, pay for professional installation.
The hidden benefit of DIY: you understand your rig. When something fails on the trail, you know how it's wired, where the bolts are, and how to fix it.
Used vs. New: Where to Save the Most
The used market for overlanding gear is deep. Previous owners often upgrade their rigs multiple times, selling old components at significant discounts.
Used LED light bars typically cost 40-50% less than new. A Nilight bar that costs $105 new might sell for $50-$65 used. Buy from sellers with photos and detailed descriptions. Ask about water ingress or damage. Most used bars work fine.
Used storage boxes follow the same pattern. A $245 Overland Gear Box might sell for $120-$150 used. Inspect for cracks, seal degradation, and broken latches.
Used tire repair kits and compressors are lower-risk purchases. These simple mechanical tools either work or don't. A used compressor costs 30-40% less and performs identically if it starts and holds pressure.
The real savings come from buying used vehicles already partially upgraded. A 2015 4Runner with LED lights, storage boxes, and a compressor already installed might cost $500-$1,000 more than a stock version. But you're buying $2,000-$3,000 worth of gear for that premium.
Facebook Marketplace, Craigslist, and specialized overlanding forums host active used markets. Check local listings first to inspect items before buying. Local purchases save money on shipping.
Overlanding is more established in Colorado, Utah, and California. Used gear prices are lower in these markets because supply is higher. In regions with less overlanding activity, used prices approach new prices.
Conclusion
Building a capable overlanding rig on a shoestring budget comes down to prioritizing essentials over aesthetics. LED lighting, tire repair systems, and weatherproof storage deliver real capability improvements.
The Precision Upgrades lineup, including the Nilight 20 Inch 126W LED Light Bar at $105.95, weatherproof storage solutions, and curated recovery gear, gives you premium quality without premium pricing. Start with these core upgrades, install them yourself, and expand as your budget allows. You'll spend $600-$1,000 building a functional rig instead of $3,000-$5,000 buying pre-assembled systems.
Shop Now at Precision Upgrades and get 15% off your first order with newsletter signup. Gear up for your next adventure without the financial burden.
Frequently Asked Questions
What are the most essential overlanding upgrades for beginners?
Start with the fundamentals: LED lighting to improve trail visibility, a portable tire repair kit and air compressor for trailside repairs, and weatherproof storage to organize and protect your gear. These three upgrades address visibility, recovery capability, and gear organization, the core needs of any overland rig. Budget $300-$500 for all three and you'll be trail-ready without overspending.
How can I start overlanding without spending a fortune?
Buy used gear where possible, prioritize essential upgrades over nice-to-haves, and tackle DIY installation to avoid labor costs. Focus on recovery points, tire pressure monitoring, and basic storage first. Many overlanders spend $1,000-$2,000 on their first rig build by mixing budget brands with strategic used purchases and handling their own installation work.
Are budget overlanding modifications reliable for long trips?
Yes, if you choose wisely. Budget brands like Nilight and Smittybilt offer proven durability for off-road use. The key is matching gear to your trip duration and terrain difficulty. A three-week backcountry trip demands higher reliability than weekend trips, invest more in critical safety items (recovery gear, tires, communication) and save on comfort items (camp chairs, coolers).
Do I need a lift kit for basic overlanding?
No. A lift kit improves ground clearance and approach angles but isn't essential for budget overlanding. Start with all-terrain tires, tire pressure monitoring, and skid plates for undercarriage protection. Many overlanders complete serious trips with stock suspension by choosing appropriate routes and driving carefully. Save the lift kit investment for when you're tackling extreme terrain.
This article was written using GrandRanker