
Table of Contents
- Why Off-Road Lighting Alternatives Matter
- Best Off-Road LED Light Bar Brands Compared
- How to Choose Off-Road Pod Lights for Your Vehicle
- Installation Guide: LED Light Bar and Pod Light Setup
- Off-Road Lighting Features That Actually Matter
- Budget vs. Premium Off-Road Lighting Performance
- Truck Bed and Campsite Illumination Solutions
- Conclusion
Last Updated: August 14, 2026
Why Off-Road Lighting Alternatives Matter
Factory headlights fail in backcountry terrain after dark, leaving rocks, ruts, and washouts invisible. Off-road lighting alternatives transform visibility from dangerous to dominant. The difference isn't just brightness, it's beam pattern, mounting durability, electrical efficiency, and weatherproofing.
This guide covers the best off-road lighting alternatives, comparing LED light bars, pod lights, and fog light kits across real-world performance, installation, and technical specs.
Best Off-Road LED Light Bar Brands Compared
The market splits between premium systems designed for specific vehicles, budget-friendly universal options, and mid-range alternatives balancing performance with value.
KC HiLiTES: Premium Pod and Light Bar Systems
KC HiLiTES dominates the premium segment with systems engineered for extreme off-road demands. Their FLEX ERA 4 LED 2-Light Master Kit Pod System ($759.99) delivers modular flexibility with mounting hardware, wiring harness, and temperature-controlled circuitry preventing thermal shutdown. Their electrical integration is exceptional: pod lights draw minimal amperage while maintaining consistent brightness across temperature swings. CNC-machined aluminum housing with aerospace-grade materials ensures corrosion resistance across years.
Baja Designs: Vehicle-Specific Hood Mount Kits
Baja Designs' S8 10" Hood Mount LED Light Bar Kit for Polaris RZR Pro XP and RZR Turbo R ($492.95) delivers 6,350 lumens of 5000K daylight-balanced output while drawing only 4.0 amps. The hood mount bracket bolts directly to OEM attachment points with zero fabrication. MoistureBlock sealing technology makes this kit submersible for water crossings. Focus on specific vehicle platforms (Polaris RZR, Ford F-150, Jeep Wrangler) limits options for less common vehicles.
Heretic: Budget-Friendly Quality with Customization
Heretic's 6 Series 30-inch Light Bar ($749.99) uses CNC-machined 6061 aluminum billet housing with stainless steel mounts and 30 LED CREE chips. You choose beam pattern (combo, spot, or flood) before purchase. Their Quattro LED pod ($134.99 each) works standalone or integrates into larger systems. For 2012+ Toyota Tacoma, their vehicle-specific fog light kit ($339.00-$339.99) bolts into factory openings without modification.
Nilight: Affordable Combo Systems for Universal Fitment
Nilight's 20-inch 126W Spot Flood Combo LED Light Bar plus 4PCS 4-inch 18W Flood LED Pods kit ($105.95) is the entry point for tight budgets. The combo includes light bar, four pod lights, wiring harness, and adjustable mounting bracket. The 126W bar delivers 8,820 lumens with balanced spot-flood pattern. Four pod lights add 1,260 lumens each in flood configuration. IP67 waterproof rating handles dust and water immersion. Universal fitment works on vans, campers, trucks, ATVs, UTVs, SUVs, and boats. Trade-off: aluminum housing isn't CNC-machined aerospace-grade material, and after 18-24 months of serious use, some users report bracket movement or lens fogging.
| Brand | Starting Price | Best For | Beam Flexibility | Weatherproof Rating |
|---|---|---|---|---|
| KC HiLiTES | $759.99 | Premium, vehicle-specific | Modular pods | Aerospace-grade sealed |
| Baja Designs | $492.95 | RZR/Ford/Jeep platforms | Fixed spot-flood | Submersible (MoistureBlock) |
| Heretic | $134.99-$749.99 | Budget with customization | Swappable patterns | IP68 stainless mounts |
| Nilight | $105.95 | Universal, entry-level | Combo included | IP67 waterproof |
How to Choose Off-Road Pod Lights for Your Vehicle
Pod lights illuminate specific zones, ditch lights flanking your approach, A-pillar lights for side visibility, or bumper lights for close-range detail. Choosing requires understanding beam pattern, mounting geometry, and durability specs.
Beam Pattern and Lumen Output
A spot beam concentrates light into a tight cone, traveling 200+ feet but leaving peripheral zones dark. A flood beam spreads across 80+ degrees, covering immediate surroundings but losing distance. A combo beam splits the difference, inner spot circle with outer flood ring, and is most practical for trail driving.
Lumen output matters contextually. A 1,000-lumen flood pod illuminates immediate surroundings adequately. Most teams find 500-1,500 lumens per pod sufficient for ditch light applications, and 2,000+ lumens for forward-facing bars. Color temperature affects driver fatigue. A 5000K daylight-balanced light feels natural and reduces eye strain during extended night driving.
Mounting Hardware and Hood Mount Brackets
The mounting system determines whether lights stay aligned after months of vibration. Quality hood mount brackets use stainless steel hardware and distribute load across multiple attachment points. Vehicle-specific brackets (Baja Designs, Heretic) bolt to factory attachment points with zero modification. Universal brackets (Nilight) require custom positioning and may not align perfectly. For permanent installations, vehicle-specific wins.
Weatherproofing and Long-Term Durability
Off-road lighting operates in harsh conditions: dust, mud, salt spray, and temperature swings from freezing to 120°F.
IP67 rating means the light survives dust immersion and temporary water submersion (up to 1 meter for 30 minutes). IP68 rating handles continuous submersion. For most trail use, IP67 suffices. For river crossings or extended water fording, IP68 or Baja's submersible MoistureBlock technology becomes essential.
Polycarbonate lenses are lighter and cheaper but yellow over time. Glass lenses maintain clarity longer but cost more and shatter under impact. Most quality brands use polycarbonate with UV-resistant coatings. KC's CNC aluminum never corrodes.
Installation Guide: LED Light Bar and Pod Light Setup
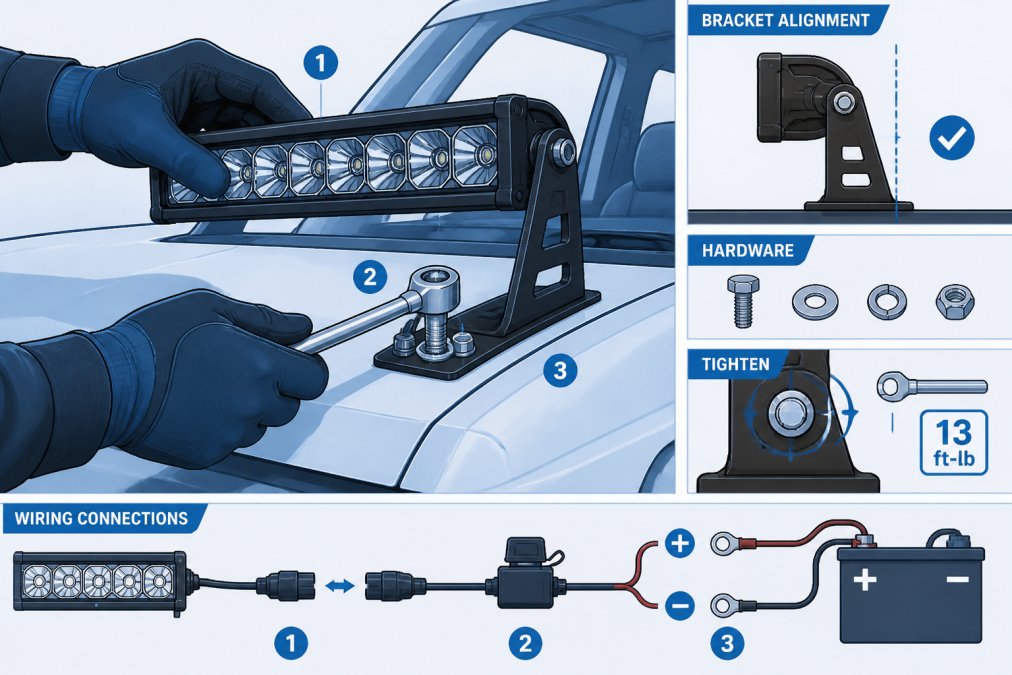
Most off-road lighting installs take 2-4 hours for DIY teams with basic tools. The process splits into four phases: gathering materials, mounting hardware, wiring, and testing.
What You'll Need Before Starting
Gather a socket set (metric and standard), wire strippers, a multimeter, electrical tape, and a 12V battery tester. Vehicle-specific kits include custom brackets and wiring harnesses. Universal kits require you to source or fabricate brackets.
Most quality kits include a wiring harness rated for your system's amperage. Don't substitute undersized wire, a 20A system on 14-gauge wire creates fire risk. A 126W system (like Nilight's) draws approximately 10.5 amps and requires 10-gauge wire minimum. You'll also need a relay and switch if your kit doesn't include them. A relay prevents voltage drop across long wire runs and protects your vehicle's electrical system from auxiliary load.
Step-by-Step Hood Mount and Bracket Installation
Step 1: Disconnect the Battery Remove the negative terminal from your vehicle's battery. Wait 10 minutes to allow residual charge to dissipate.
Step 2: Position the Bracket For vehicle-specific kits, align the bracket with factory attachment points. For universal brackets, position the light bar for optimal beam geometry, typically 15-20 degrees downward from horizontal to avoid blinding oncoming traffic while illuminating the trail ahead.
Step 3: Drill Mounting Holes (if necessary) Use a drill bit matching your bracket bolts. Create pilot holes first, then full-size holes. Deburr holes with a countersink to prevent sharp edges that trap dirt and moisture.
Step 4: Install the Bracket Bolt the bracket to your vehicle using stainless steel hardware. Tighten bolts in a cross pattern to distribute load evenly. Verify the bracket doesn't flex or shift under hand pressure.
Step 5: Mount the Light Bar Attach the light bar to the bracket using provided hardware. Ensure the beam aims slightly downward. Most light bars include adjustable mounts allowing 15-30 degrees of tilt.
Wiring Harness and Electrical Load Considerations
Run the positive wire from your battery's positive terminal through a 30A inline fuse to your switch, then to the relay. The relay's output connects to the light bar. Route wiring away from moving parts and sharp edges using conduit or loom. Secure wiring with zip ties every 12 inches to prevent vibration-induced chafing.
Ground the light bar directly to the vehicle's chassis using a quality ground cable. Strip paint at the ground point to bare metal for solid contact. A single 126W light bar draws approximately 10.5 amps. Combined with existing 4WD electronics, you're potentially drawing 50-60 amps during peak use. Verify your alternator can handle this load. Most modern trucks manage it easily, but older vehicles or those with heavy auxiliary systems might need an upgraded alternator.
Common Installation Mistakes to Avoid
Undersized wiring: For a 20-foot run on a 20A system, 10-gauge barely meets minimum standards. 8-gauge is safer.
Poor ground connections: A corroded or loose ground wire causes intermittent failures and dim lighting. Strip paint, use a star washer, and apply dielectric grease to prevent corrosion.
Ignoring beam angle: A 15-20 degree downward angle illuminates the trail while keeping light off approaching vehicles.
Skipping the relay: Direct wiring from battery to switch to light bar overloads your vehicle's electrical system and can damage the switch.
Off-Road Lighting Features That Actually Matter
Not all lighting specs matter equally. Some features are marketing noise. Others determine whether your system survives the season.
Spot vs. Flood Beam Patterns
A spot beam concentrates light into a tight cone (15-20 degrees wide), traveling 300+ feet for high-speed trail runs but leaving everything outside the beam cone dark.
A flood beam spreads across 80-120 degrees, illuminating your entire approach zone but losing effectiveness beyond 150 feet.
A combo beam splits the difference, tight spot circle in the center with flood ring surrounding it. This is the practical choice for most trail driving, balancing distance visibility with peripheral awareness.
SAE Compliance and Legal Beam Distance
SAE (Society of Automotive Engineers) standards define legal auxiliary lighting. SAE J583 governs spot beams. SAE J584 covers flood beams. These standards define lumen output, beam geometry, and color temperature.
Legal compliance matters because improperly aimed auxiliary lighting blinds oncoming traffic and creates accident risk. SAE-compliant beams have defined hot spots and falloff patterns minimizing glare. Most quality brands (KC, Baja, Heretic) engineer SAE compliance into their systems. Beam distance depends on lumen output and beam pattern. A 6,000-lumen spot beam reaches 250+ feet. A 6,000-lumen flood beam reaches 100-150 feet.
Vibration Resistance and Weatherproof Ratings
Quality systems use thick-wall aluminum housings, stainless steel hardware, and precision-machined brackets resisting vibration-induced loosening. IP67 means dust-tight and water-resistant to 1 meter for 30 minutes. IP68 means dust-tight and submersible. For most trail use, IP67 suffices. For river crossings or extended water immersion, IP68 or Baja's submersible rating becomes necessary.
Quality LED systems operate reliably from -20°F to 160°F. Budget systems sometimes throttle brightness above 140°F to prevent thermal damage.
Truck Bed and Campsite Illumination Solutions
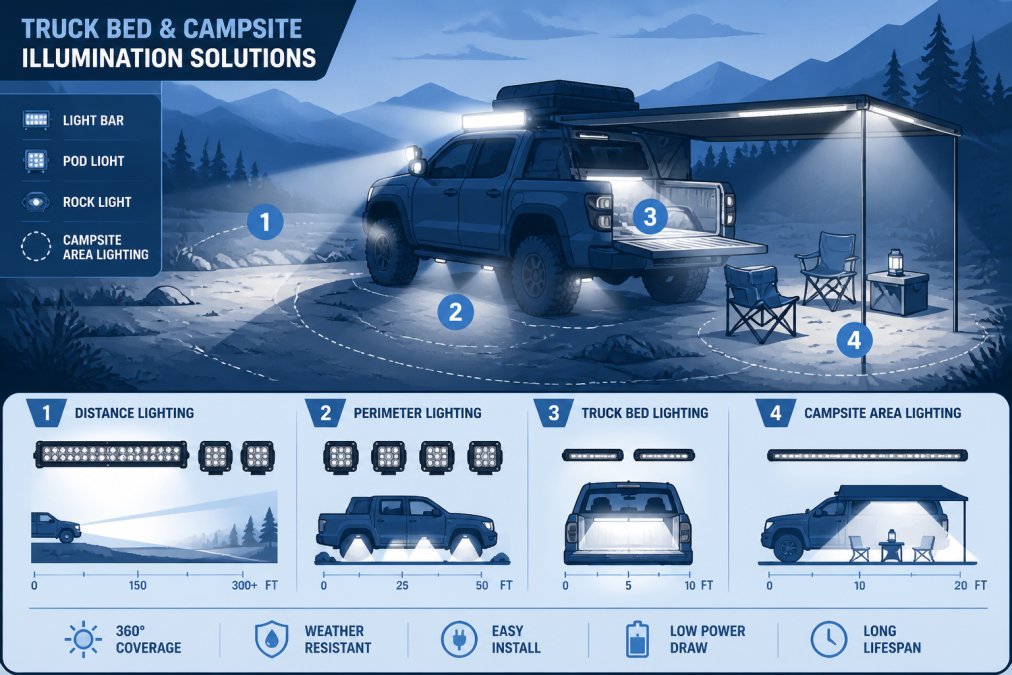
Beyond trail lighting, campsite illumination transforms overlanding experience. Truck bed lighting typically uses flood-pattern pod lights mounted on bed side rails or tailgate. Four to six 18W flood pods provide adequate illumination for cooking, equipment organization, and general movement around camp. The Nilight system includes four pods perfect for this application.
Campsite perimeter lighting uses lower-lumen flood pods (500-1,000 lumens each) positioned around your camp boundary. Heretic's Quattro pods ($134.99 each) work well for this application, offering customizable beam patterns and compact form factor.
For extended camp stays, battery drain becomes a consideration. A single 126W light bar draws 10.5 amps continuously. Running it for 4 hours drains 42 amp-hours from your battery. LED efficiency helps here. A 6,000-lumen LED system draws 50 watts. A comparable halogen system draws 200+ watts. Over a 4-hour camp evening, the LED saves 600 watt-hours (approximately 50 amp-hours) compared to halogen.
Many teams combine multiple light types: a 20-30 inch light bar for trail work, pod lights for campsite coverage, and small cube lights for detail work. This modular approach deploys lighting appropriate to each situation without overloading your electrical system.
Conclusion
Off-Road lighting alternatives split into clear tiers: premium systems like KC HiLiTES for expedition-grade reliability, vehicle-specific engineering from Baja Designs for platform-matched performance, budget-friendly options from Nilight for entry-level teams, and customizable mid-range systems from Heretic balancing cost and flexibility.
At Precision Upgrades, we stock all these options because different rigs need different solutions. A 2015 Tacoma doing monthly trail runs has different requirements than a 2024 Polaris RZR running remote expeditions. Our team can match your vehicle, budget, and intended use to the lighting system that actually delivers.
Shop our curated selection of LED light bars, pod lights, and fog light kits. Get 15% off your first order with newsletter signup, and experience fast shipping on premium overlanding gear built for the trail. Shop Now
Frequently Asked Questions
What are the best alternatives to Offroad Alliance for off-road lighting?
Top alternatives include KC HiLiTES for premium pod systems ($759.99 FLEX ERA 4 kit), Baja Designs for vehicle-specific hood mounts ($492.95 S8 10" kit), Heretic for budget-friendly quality ($749.99 30" light bar), and Nilight for affordable universal combo systems ($105.95). Each brand offers different strengths: KC excels in customization, Baja in ease of installation, Heretic in value, and Nilight in affordability with solid lumen output.
How do I choose the right off-road pod lights for my truck?
Start by identifying your primary use: highway driving, trail work, or campsite setup. Check the beam pattern (spot for distance, flood for area coverage, combo for both). Verify lumen output, higher lumens mean brighter illumination. Confirm weatherproof ratings (IP67 or better) and mounting hardware compatibility with your vehicle. Consider electrical load; most modern trucks handle 4-6 amps without upgrades. Finally, check warranty coverage and customer reviews for real-world durability on similar vehicles.
Are universal LED light brackets compatible with all truck models?
Universal mounting brackets work with most trucks, but vehicle-specific kits offer better fitment and cleaner installation. Universal brackets require custom fabrication or drilling, while vehicle-specific options like the Baja Designs S8 hood mount for Polaris RZR or Heretic Tacoma fog light kits drop in without cutting. If your exact model isn't available, universal brackets from brands like Nilight work across vans, campers, pickups, and SUVs with proper adjustment.
What's the difference between budget and premium off-road lighting?
Budget options like Nilight ($105.95 combo kit) deliver solid brightness and waterproofing at lower cost but may have shorter lifespans. Premium brands like KC HiLiTES ($759.99+) and Baja Designs ($492.95+) offer superior lens durability, better thermal management, longer warranties, and precise beam control. Premium lights maintain brightness longer (50,000+ hours), resist vibration better, and come with replaceable optics. For serious overlanding, premium justifies the investment; for occasional use, budget alternatives perform well.
This article was written using GrandRanker