
Table of Contents
- Why Trail Vibration Damages Your Gear
- Vibration Dampening Materials That Actually Work
- Anti-Vibration Mounts for Off-Road Vehicles
- Off-Road Gear Storage Solutions for Trail Protection
- Camera Gear Protection Off-Road: Specialized Strategies
- Protecting Gear From Trail Vibration: Step-by-Step Setup
- Common Mistakes When Protecting Off-Road Gear
- Conclusion
Protecting Gear From Trail Vibration: A Complete Guide
Last Updated: July 30, 2026
When you're pushing your truck or motorcycle through technical terrain, protecting gear from trail vibration becomes critical. At Precision Upgrades, we understand that vibration isn't just an annoyance, it's a cumulative force that degrades electronics, loosens mechanical connections, and accelerates wear on sensitive gear. This guide covers the science behind vibration damage and practical strategies that actually protect your equipment on demanding trails.
High-frequency vibration from rough terrain can destroy camera sensors, degrade battery connections, and cause structural failure in mounting systems. Many overlanders discover this the hard way: a three-week expedition returns with dead electronics or cracked lenses that should have survived.
Why Trail Vibration Damages Your Gear
Off-road terrain generates forces far beyond what casual drivers experience. A rocky wash or washboard surface creates sustained vibration in the 5-25 Hz range, while impacts from rocks and ruts spike well above 50 Hz. These repetitive shocks accumulate stress on every component in your vehicle.
Electronics suffer first. Camera sensors have microscopic moving parts that can shift under constant vibration. Hard drives have spinning platters that can be damaged by sustained shaking. Battery terminals corrode faster when connections constantly loosen and tighten.
Long-term health impacts extend beyond gear. Riders who spend extended time on vibrating vehicles report wrist fatigue, shoulder pain, and hand numbness, conditions that persist long after the trip ends. Handlebar feedback becomes harder to read when your hands are numb, which increases your risk on technical terrain.
Mechanical connections weaken under vibration. Bolts slowly loosen even when properly torqued. Welds can develop micro-cracks. Rubber components harden and lose elasticity. This is why overlanders with well-maintained vehicles still experience unexpected failures on rough trails.
Vibration Dampening Materials That Actually Work
Closed-cell foam and elastomer technology form the foundation of modern vibration control. Closed-cell foam traps air in sealed pockets; when vibration hits, the trapped air compresses and releases, absorbing energy rather than transmitting it. Elastomers (synthetic rubber compounds) flex under load and dissipate energy through internal friction.
Closed-cell foam excels at dampening high-frequency vibration (sharp impacts from rocks). Elastomers handle low-frequency vibration better (sustained rumbling from washboard). The best protection uses both materials in layers, addressing the full spectrum of trail vibration.
D3O armor represents the next generation of vibration-absorbing materials. Originally developed for motorcycle protective gear, D3O polymers stay flexible during normal movement but instantly harden on impact. This means your gear absorbs vibration continuously while remaining responsive to quick movements.
Gel-based and composite absorption systems combine multiple materials into engineered solutions. Gel pads stay flexible across temperature ranges, critical because desert trails swing from freezing at dawn to scorching by midday. Composite systems layer foam, gel, and elastomer in specific combinations tuned for particular vibration frequencies.
Vibration dampening materials degrade over time. UV exposure hardens foam. Repeated compression reduces elastomer resilience. Plan to replace protective materials every 18-24 months of regular use, or sooner if you spend significant time on extremely rough terrain.
Anti-Vibration Mounts for Off-Road Vehicles
Isolation mounts reduce shock transfer by decoupling connections. A rigid connection transmits vibration directly from the source to whatever's attached. An isolation mount introduces a flexible element between them, causing vibration to encounter resistance that absorbs or redirects energy.
The most effective isolation mounts use elastomer bushings combined with internal damping chambers. When vibration hits the mount, the elastomer flexes, and internal fluid (typically silicone-based) dampens the movement. This two-stage system handles both initial shock and follow-on vibration.
Choosing the right mount stiffness requires balancing two competing needs. A softer mount absorbs more vibration but allows more movement. A stiffer mount keeps things locked in place but transmits more vibration. For camera gear mounted on a roll cage, a medium-stiffness mount (rated for 10-15 lb loads) typically works best. For heavy equipment like winches, stiffer mounts (20-30 lb rating) prevent excessive movement.
Mount placement matters as much as the mount itself. Position equipment as close as possible to the vehicle's center of gravity and as far as possible from suspension articulation points. A camera mounted on the rear bumper experiences 3-4 times more vibration than the same camera mounted near the vehicle's center.
Off-Road Gear Storage Solutions for Trail Protection
Padded cases and shock-absorbent containers form the first line of defense for stationary equipment. Quality cases use dense foam interiors that conform to your specific gear, preventing movement during transit. The difference between cheap and quality cases comes down to material thickness and foam density. Cases with 2-3 inches of dense foam (rated for impact absorption) significantly reduce vibration transmission.
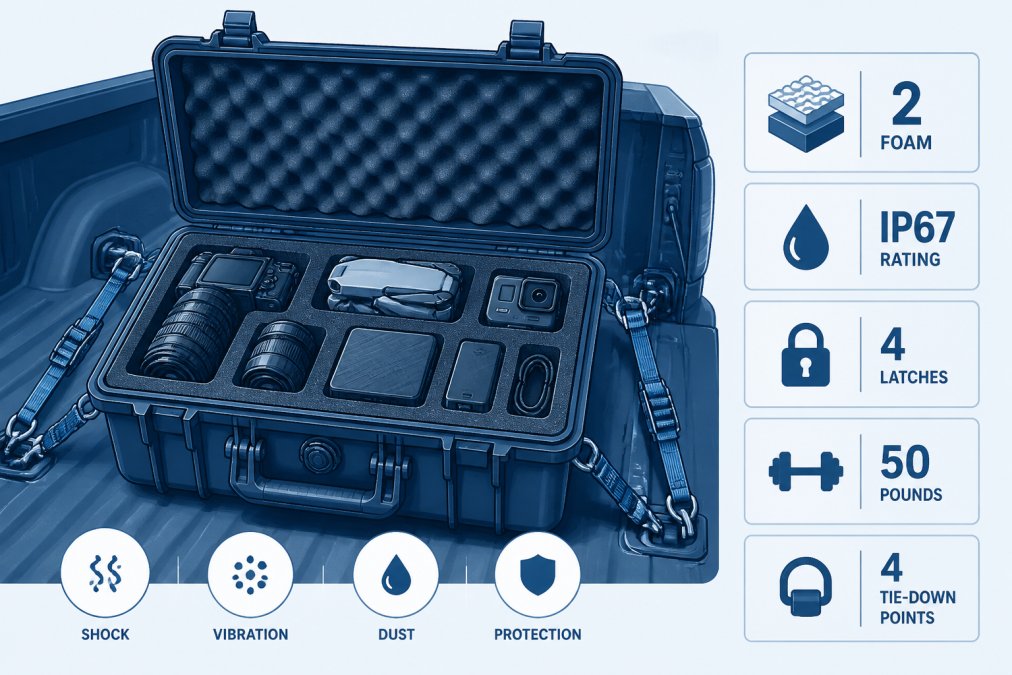
Strategic placement requires understanding where vibration is worst inside your vehicle. The cargo bed experiences more vibration than the cab. Wheel wells transmit more vibration than areas near the vehicle's center. Position your most sensitive gear (cameras, electronics, hard drives) in the center of your vehicle, as low as possible, and away from wheel wells.
Use additional isolation between cases and vehicle surfaces. Rubber pads or foam blocks underneath cases reduce vibration transmission by 40-60%. This layered approach, quality case, dense foam interior, isolation pads, strategic placement, provides comprehensive protection.
Weight distribution affects vibration throughout your vehicle. Overloading one area creates uneven suspension compression, which increases vibration in that section. Distribute gear weight evenly across the cargo area to keep suspension travel balanced.
Camera Gear Protection Off-Road: Specialized Strategies
Camera sensors contain millions of microscopic pixels; each can be damaged by vibration-induced stress. Lens elements are precisely aligned; vibration can cause that alignment to shift, creating permanent focus issues or internal damage.
The most common failure point is the lens mount. Vibration causes micro-movements that gradually loosen the mount. Protect this critical connection with a vibration-isolating lens support bracket that distributes load across multiple points rather than concentrating stress on the mount.
For stationary cameras mounted on your vehicle, a three-axis gimbal with active stabilization provides the best protection. The camera stays centered regardless of vibration, protecting equipment and ensuring usable footage. For handheld cameras, mechanical stabilization through quality tripods with vibration-damping feet isolates the camera from vehicle vibration.
Protecting Gear From Trail Vibration: Step-by-Step Setup
Step 1: Assess your gear's vibration vulnerability by evaluating what you're protecting and how sensitive each item is. Electronics are most vulnerable, cameras, laptops, power banks, and communication devices all contain components that degrade under vibration. List every piece of gear and categorize each as high-sensitivity (cameras, electronics), medium-sensitivity (tools, spare parts), or low-sensitivity (camping gear, recovery equipment).
Step 2: Select appropriate dampening materials based on your specific needs and budget. Start with closed-cell foam for basic protection. If you have sensitive electronics or plan extended expeditions, invest in gel-based systems or D3O armor for critical components. Calculate the total weight of gear you're protecting to determine the load rating you need for isolation mounts.
Step 3: Install isolation mounts and secure storage by identifying mounting locations that minimize vibration transmission. Avoid mounting directly to the frame or suspension components. Use isolation pads under any case or equipment that sits on vehicle surfaces. Install mounts using the manufacturer's recommended fasteners and tighten firmly without over-torquing.
Step 4: Test and adjust for your terrain type by taking a short ride on the roughest terrain you'll encounter. Check for any movement in mounted equipment and listen for rattling or loose connections. After your test ride, adjust mount stiffness if needed. Make one change at a time so you can identify what actually improves performance.
Common Mistakes When Protecting Off-Road Gear
The first major mistake is assuming rigid protection equals good protection. Bolting equipment directly to your vehicle frame actually transmits maximum vibration to that equipment. Rigid connections have no flexibility to absorb or dissipate vibration energy. Slightly flexible mounting that allows controlled movement provides better protection.
Another critical error is using the wrong materials for your climate. Foam that works in temperate conditions hardens in cold and becomes mushy in extreme heat. If you're traveling through varied climates, specify materials rated for the full temperature range you'll encounter.
Many overlanders protect their gear but neglect to protect the mounting system itself. Inspect mounts regularly and replace them at the first sign of degradation. Overloading storage cases is also common, a case rated for 50 pounds gets stuffed with 75 pounds. Overloading compresses protective foam and stresses the case structure.
Inadequate isolation between layers is another frequent problem. You might have a quality case with good foam, but then bolt that case directly to your vehicle frame. Use isolation pads or flexible mounting brackets between cases and vehicle surfaces.
Conclusion
Protecting gear from trail vibration requires attention to details that most casual overlanders ignore. The cost of protecting your equipment properly is a fraction of the cost of replacing it mid-expedition when you're hundreds of miles from civilization.
Precision Upgrades provides premium overlanding gear, high-performance LED lighting, and essential outdoor accessories tailored for trucks, SUVs, and motorcycles. Our curated selection is built to withstand the rigors of the trail, ensuring you are fully equipped for your next adventure. Experience fast shipping and reliable quality designed to enhance your vehicle's capability and style. Join our community of outdoor enthusiasts and gear up for the journey ahead. Shop Now
Frequently Asked Questions
What materials are best for vibration dampening when protecting gear from trail vibration?
Closed-cell foam, elastomers, and gel-based composites are top choices for vibration dampening. Closed-cell foam excels at absorbing high-frequency vibration without compressing permanently. Elastomers provide flexibility and shock absorption across varied terrain. Gel-based systems offer superior impact protection for sensitive electronics. The best material depends on your specific gear type and the technical terrain you'll encounter. Combination approaches, layering different materials, often deliver superior protection than single-material solutions.
How do anti-vibration mounts protect equipment during off-road adventures?
Anti-vibration mounts work by isolating your gear from direct vehicle vibration through elastomeric or spring-based suspension. They absorb shock transfer before it reaches sensitive equipment like cameras, electronics, or navigation systems. Proper mount selection requires matching stiffness to your vehicle weight and terrain type. Stiffer mounts handle heavier loads and rougher terrain; softer mounts suit lighter gear on moderate trails. Installation in strategic locations, between your gear and vehicle frame, creates a vibration barrier that significantly reduces long-term damage risk and maintains equipment functionality.
Can trail vibration actually damage sensitive electronics and camera gear?
Yes, prolonged trail vibration can cause significant damage to electronics and camera equipment. High-frequency vibration loosens internal components, degrades solder joints, and causes sensor misalignment in cameras. Lenses are particularly vulnerable, vibration can affect autofocus mechanisms and image stabilization systems. Extended exposure to rough terrain vibration accelerates wear on delicate parts and can eventually lead to equipment failure. Protecting gear from trail vibration through proper dampening materials and storage solutions prevents costly repairs and extends equipment lifespan, making protection an investment in durability.
What's the best way to set up camera gear protection off-road without adding too much weight?
Use lightweight closed-cell foam padding combined with vibration-resistant mounting systems rather than heavy cases. Position camera gear on anti-vibration mounts within your vehicle to minimize direct contact with the frame. Secure cables and straps to prevent internal movement during technical terrain navigation. Consider gel-based protective sleeves for lenses and bodies, they're lightweight but highly effective. Distribute weight evenly across your storage setup to maintain vehicle balance. Test your configuration on moderate trails first before extended backcountry trips to ensure both protection and accessibility.
[EXTERNAL_LINK: SAE International vibration standards for vehicle-mounted equipment | sae.org]
[EXTERNAL_LINK: NHTSA guidelines on vehicle suspension and shock absorption | nhtsa.gov]
[EXTERNAL_LINK: American Society of Mechanical Engineers research on vibration isolation techniques | asme.org]
This article was written using GrandRanker