
Table of Contents
- Why Do Aftermarket LED Lights Fog: Electrical vs. Moisture
- Causes of Headlight Condensation: Seal Integrity and Housing Design
- Electrical Load and Current Draw: The Hidden Culprit Behind Fogging
- Prevent Moisture in LED Headlights: Seal Repair and Maintenance
- Aftermarket LED Headlight Condensation Fix: Step-by-Step Solutions
- Headlight Seal Repair: Long-Term Solutions for Degraded Housings
- Common Mistakes That Make Aftermarket LED Lights Fog Worse
- Conclusion: Choosing Quality LED Lighting That Won't Fog
Why Do Aftermarket LED Lights Fog? Complete Troubleshooting Guide
Last Updated: July 28, 2026
Why Do Aftermarket LED Lights Fog: Electrical vs. Moisture
Aftermarket LED headlight fogging stems from two distinct root causes: condensation from moisture ingress, or electrical stress degrading internal components. Confusing these problems leads to wasted money on the wrong fix. Voltage fluctuations and thermal stress from incompatible wiring can degrade housing seals just as effectively as water intrusion.
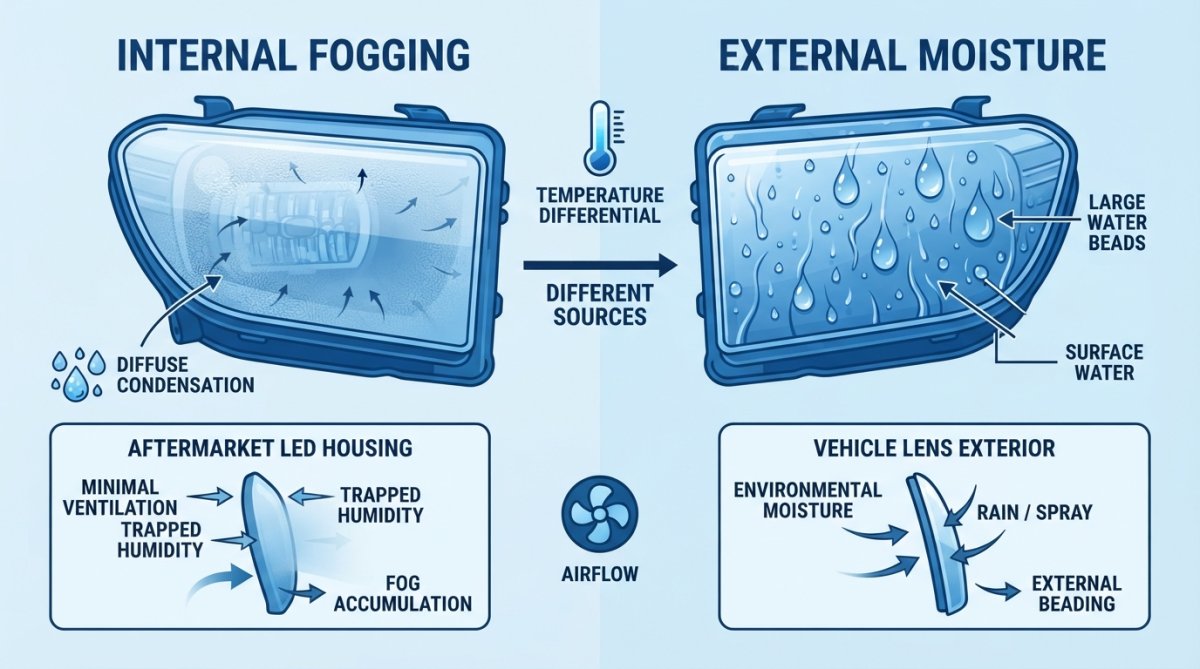
Take a photo of the fogging pattern before troubleshooting. Moisture typically appears as water droplets or uniform haze on the interior lens. Electrical degradation shows as discoloration, corrosion on the reflector, or localized dark spots. The pattern tells you which direction to investigate first.
The Critical Difference Between Condensation and Electrical Fogging
Condensation and electrical fogging demand completely different repair strategies. Condensation is straightforward: water vapor enters the housing and condenses on the cooler lens surface. Electrical fogging occurs when voltage spikes and thermal cycling degrade the reflective coating, sealant, and LED components.
Treating condensation with electrical troubleshooting wastes time, and vice versa. If moisture is your problem, resealing or replacing the unit solves it. If electrical stress is degrading your seals and reflector, resealing alone won't help because the underlying electrical mismatch continues destroying the housing.
LED systems operate differently than halogens. They run cooler, so condensation forms more easily with high temperature differentials. A voltage drop of just 0.5V can trigger cascading failures in LED drivers and cause thermal stress that weakens seals.
Causes of Headlight Condensation: Seal Integrity and Housing Design
Moisture enters LED headlight housings through degraded seals and connector points. The housing seal is engineered to handle normal temperature swings, but it has limits. Cheap aftermarket housings use lower-grade silicone or polyurethane that degrades faster under UV exposure and thermal cycling. Premium housings use better sealant, but even those fail over time.
The connector is the second pathway. If the connector isn't fully seated, moisture can wick up the wiring and into the housing. Temperature cycling accelerates both failure modes through expansion and contraction.
How Housing Seals Degrade Over Time
The sealant around your LED headlight lens faces constant attack from UV radiation, ozone exposure, road salt, and vibration. Most aftermarket LED housings start failing within 18-36 months of regular use. The failure is gradual: the sealant becomes brittle, develops micro-cracks, and loses adhesion to the lens edge. Water doesn't need a large gap; capillary action pulls moisture through tiny cracks.
Cheap housings fail faster because they use lower-grade sealant and thinner lens material. Premium housings use thicker polycarbonate lenses and better sealant formulations, extending service life by months or years.
Moisture Ingress Through Connector Points
Your LED headlight connects to the vehicle's wiring through a connector with a rubber seal designed for normal driving. Installation quality matters enormously. A plug-and-play LED bulb adapter installed carelessly, not fully pushed into the socket, bent wires, damaged seal, will let moisture in immediately.
Electrical Load and Current Draw: The Hidden Culprit Behind Fogging
Your vehicle's wiring harness was designed for specific power draws. OEM halogen bulbs draw 55-60 watts per bulb. Many aftermarket LED kits draw 15-25 watts per bulb. This mismatch causes problems most guides don't address.
When you install an LED bulb drawing far less current than the original halogen, the vehicle's electrical system responds. The CANbus system detects the lower load and interprets it as a bulb failure, sending current pulses (PWM signals) to "wake up" the circuit. These pulses wreak havoc on LED drivers.
The thermal stress from voltage fluctuations and current spikes degrades the housing seal from the inside. The LED driver generates heat as it struggles to regulate unstable power, accelerating sealant degradation. Over weeks or months, the combination of thermal stress and electrical instability weakens the seal enough that external moisture penetrates.
Wattage mismatch is the most overlooked cause of premature fogging in aftermarket LED installations.
Voltage Drop and Thermal Stress
Voltage drop is the silent killer of aftermarket LED headlights. Every connection in your electrical circuit has some resistance. A small drop is normal. A large drop is catastrophic.
If your aftermarket LED kit has a poor ground connection, corroded connectors, or undersized wiring, voltage at the headlight will be significantly lower than at the battery. A fully charged battery provides 13.5-14.5 volts. If voltage at the LED headlight is only 11 volts due to poor connections, the LED driver operates in a stressed state, working harder to maintain brightness and generating excess heat.
This excess heat degrades surrounding components. The sealant becomes brittle faster. Plastic components warp. Premium housings include heat sinks that dissipate heat away from the lens and seal. Cheap housings skip this, allowing heat to build up and seals to fail.
CANbus Interference and Flickering Effects
Modern vehicles use CANbus systems to monitor the headlight circuit. When you install an aftermarket LED that doesn't match the OEM current draw, the CANbus system detects the mismatch and responds.
If the vehicle's system is sensitive, it may send rapid on-off pulses to the headlight circuit, trying to verify the bulb is present. These pulses are typically 100-1000 Hz, too fast for the human eye to detect as flickering, but fast enough to stress the LED driver.
The LED driver must respond to these pulses. If the driver wasn't designed for your specific vehicle's CANbus protocol, it can't respond correctly. The driver enters a state of constant correction, rapidly adjusting output to match the vehicle's expectations. This creates electrical noise and heat that degrades components inside the housing, weakens seals, and can discolor the reflector coating.
The fix is either a resistor (to simulate the OEM load) or a decoder module that translates the vehicle's CANbus signals into something the LED driver understands.
Prevent Moisture in LED Headlights: Seal Repair and Maintenance
Prevention is far simpler than repair. Start with quality housings engineered with premium sealant and proper heat sink design. If you already have aftermarket LEDs installed, maintenance prevents problems. Inspect the housing exterior regularly for cracks or damage. Check the connector for corrosion or moisture. Ensure all connections are tight and fully seated.
Ventilation also matters. Some LED housings include a small vent that allows internal pressure to equalize with external pressure, reducing condensation. Make sure this vent isn't blocked.
Inspecting Housing for Cracks and Degradation
A visual inspection every 6-12 months catches problems early. Look for cracks in the lens or housing body, separation between the lens and housing rim, discoloration or cloudiness inside the lens, corrosion around the connector, and moisture droplets visible inside the housing.
If you find any of these, the housing needs attention. Small cracks can sometimes be sealed with clear epoxy, but this is temporary. A properly degraded seal usually requires housing replacement or professional resealing, which costs $150-300 per headlight.
Ventilation and Heat Sink Performance
Heat management directly impacts seal longevity. If your LED headlight housing has a heat sink, keep it clean. Dust buildup insulates the heat sink and reduces effectiveness. Clean it every 6 months or after dusty driving.
Ensure good airflow around the housing. Don't cover the back with tape, mud, or debris. Ventilation membranes help prevent condensation by allowing air to pass through while blocking liquid water.
Aftermarket LED Headlight Condensation Fix: Step-by-Step Solutions
Fixing fogging requires diagnosing the root cause first. Is it moisture, electrical stress, or both? The diagnosis determines the repair path.
Diagnosing the Root Cause Before You Fix
Start with a visual inspection and photo of the fogging pattern. Check for error messages or warning lights on your dashboard. If you're getting a "headlight fault" message, electrical mismatch is likely. If there's no error message and the headlights work fine, moisture is probably the culprit.
Test the connector by turning off the headlights, waiting 30 minutes to cool, then carefully disconnecting the LED bulb connector. Inspect it for corrosion or moisture. If you see white or green corrosion, moisture has been entering through the connector.
Check for voltage drop using a multimeter. Measure voltage at the battery with headlights off, then at the LED headlight connector with headlights on. The difference should be less than 0.5V. If larger, you have a poor ground or high-resistance connection.
Research whether your specific vehicle is known for CANbus compatibility issues with aftermarket LEDs. Many forums and owner groups discuss this.
Electrical Troubleshooting: Testing Voltage and Current Draw
With the headlights on, measure voltage at the LED bulb connector using a multimeter. It should read 13-14.5V. If it reads below 12V, you have a voltage drop problem. If it fluctuates or drops below 12V intermittently, the CANbus system is sending pulses.
Current draw testing requires a multimeter that measures DC current. Disconnect the LED bulb connector and insert the multimeter in series with the circuit. Compare the measured current to the OEM specification. If your LED draws significantly less current than the OEM bulb, you have a mismatch.
Many aftermarket LED kits include a resistor or decoder to address mismatch. If your kit came with one, ensure it's installed correctly. If not, you may need to add one after installation. A resistor simulates the OEM load, preventing CANbus detection of a mismatch. A decoder actively translates CANbus signals, providing more compatibility but adding complexity.
If testing reveals voltage drop, improve the electrical connection. Check the ground wire from the headlight to the chassis. If corroded or loose, clean and tighten it. Check the power wire for corrosion or damage.
Moisture Removal and Housing Restoration
If moisture is the culprit, you have two options: reseal the housing or replace it.
Resealing involves carefully removing the lens from the housing, cleaning out moisture and old sealant, and applying fresh sealant around the lens edge. This requires a heat gun to soften the old sealant, a plastic scraper to remove it without damaging the lens, and new automotive-grade silicone or polyurethane sealant. The process takes 2-4 hours per headlight. Heat the housing gently, peel off the lens, clean the surfaces thoroughly, apply new sealant, and reinstall the lens. Let the sealant cure for 24 hours before using the headlights.
If resealing feels too involved, replacement is the alternative. A new housing costs more upfront but guarantees a fresh seal and proper assembly.
| Repair Option | Time Required | Cost Range | Best For |
|---|---|---|---|
| Reseal housing (DIY) | 2-4 hours | $20-50 materials | Single headlight, patient DIY |
| Reseal housing (professional) | 1-2 hours labor | $150-300 per headlight | Both headlights, preferred finish |
| Replace housing | 1-2 hours installation | Cost varies by model | Warranty coverage, long-term reliability |
Headlight Seal Repair: Long-Term Solutions for Degraded Housings
Once a seal has failed, it's prone to fail again. The underlying cause, whether moisture ingress or electrical stress, is still present. Resealing is temporary unless you address the root cause.
Resealing vs. Housing Replacement
Resealing makes sense if the housing is otherwise in good condition and the failure was due to normal seal degradation. If the housing is less than 3 years old and you've maintained it properly, resealing can give you another 2-3 years of service. If the housing is older or the seal failed due to electrical stress, replacement is the better long-term investment.
The decision depends on how much you value your time. Resealing is labor-intensive. If you're paying a shop, the cost approaches the cost of a new housing. Replacement offers the benefit of newer design improvements, better heat sinks, improved sealant formulations, and sometimes enhanced optical design.
OEM Wiring Compatibility and Connector Upgrades
Your vehicle's OEM wiring harness was designed for halogen bulbs. Aftermarket LED connectors sometimes use lower-quality contacts that introduce resistance, causing voltage drop and heat generation. Over time, heat degrades the connector seal, allowing moisture in.
Upgrading to a higher-quality connector reduces resistance and improves reliability. For serious off-road use or high-reliability applications, consider a full wiring harness upgrade designed specifically for LED headlights, with proper gauge wiring, high-quality connectors, and integrated protection (fuses, relays, decoders).
Common Mistakes That Make Aftermarket LED Lights Fog Worse
Most owners make the same mistakes when installing or troubleshooting aftermarket LEDs.
Ignoring Wattage Mismatch and Electrical Load Issues
The most common mistake is assuming an LED bulb is "plug and play" and compatible with your vehicle simply because it physically fits. A 20-watt LED bulb draws a fraction of the current of a 55-watt halogen bulb. Your vehicle's electrical system notices this mismatch and tries to compensate, creating electrical stress that degrades the housing seal and LED driver.
The fix is straightforward: use a resistor or decoder that matches your vehicle's requirements. A resistor costs $20-50. A new housing costs $200-400. The math is clear.
Overlooking Vehicle-Specific CANbus Requirements
Different vehicle manufacturers implement CANbus systems differently. Some vehicles tolerate aftermarket LEDs without modification. Others require a decoder to function properly.
Before installing aftermarket LEDs, research your specific vehicle on forums and owner groups. Look for reports of CANbus issues. If your vehicle is known to have compatibility problems, budget for a decoder or resistor. This step prevents months of frustration and potential damage to your electrical system.
Conclusion: Choosing Quality LED Lighting That Won't Fog
Aftermarket LED headlights offer superior brightness and efficiency compared to halogen bulbs, but they require proper installation and maintenance to avoid fogging problems. The root cause is usually moisture ingress through degraded seals or electrical stress from voltage mismatch and CANbus incompatibility. Identifying which problem you have determines the fix.
Quality LED headlight kits are engineered to prevent both failure modes. Premium housings use high-grade sealant and integrated heat sinks to manage thermal stress. Vehicle-specific decoders and resistors ensure CANbus compatibility. Detailed installation guides and support ensure proper setup.
When you choose quality LED headlights, you're choosing products built to withstand rigorous off-road use and daily driving.
SAE automotive electrical standards for vehicle lighting define the specifications that OEM headlights meet. National Highway Traffic Safety Administration guidance on vehicle lighting provides regulatory context for headlight performance and safety requirements. For technical troubleshooting, Automotive electrical system diagnostics guide offers detailed information on voltage drop testing and CANbus diagnostics.
Frequently Asked Questions
What's the difference between condensation and a leak in aftermarket LED headlights?
Condensation forms inside the housing when temperature and humidity fluctuate, appearing as fine mist on the lens interior. A leak involves active water ingress through damaged seals, connectors, or cracks, resulting in pooled water or rapid fogging. True condensation may clear when the headlight warms up; leaks persist. Both indicate seal integrity problems, but leaks require immediate repair to prevent short circuits and electrical damage to the LED assembly.
How do I prevent moisture in LED headlights without replacing the entire housing?
Inspect seals quarterly for cracks or degradation, especially around connector points. Ensure proper grounding and check for voltage drop issues that cause excess thermal stress. Use a resistor or decoder if your vehicle's CANbus system is triggering flickering, as this electrical instability accelerates seal wear. Verify that your aftermarket LED's wattage matches OEM specifications to avoid overheating. For existing moisture, carefully reseal the housing with automotive-grade silicone, ensuring the heat sink has adequate ventilation to manage thermal output.
Can an electrical problem cause aftermarket LED lights to fog?
Yes. Voltage fluctuations, excessive current draw, or CANbus interference can cause the LED to overheat, creating internal condensation. A wattage mismatch stresses the housing seals through thermal cycling. Flickering caused by relay trigger issues or PWM (Pulse Width Modulation) problems also generates heat spikes. Diagnostic testing with a multimeter can reveal voltage drop; if it exceeds 0.5V, your wiring or connector is undersized. Addressing electrical load issues often eliminates fogging without replacing the housing.
What causes headlight condensation in brand-new aftermarket LED lights?
New LED housings fog when manufacturing seals are defective, when the connector compatibility with your OEM wiring harness creates poor grounding, or when the light projection design lacks adequate ventilation for the heat sink. Rapid temperature changes during initial use can also trigger condensation if the housing wasn't sealed properly. Check that your vehicle's electrical system can support the LED's electrical load, if your alternator or fused circuit is undersized, voltage fluctuations will cause immediate thermal stress and fogging.
This article was written using GrandRanker